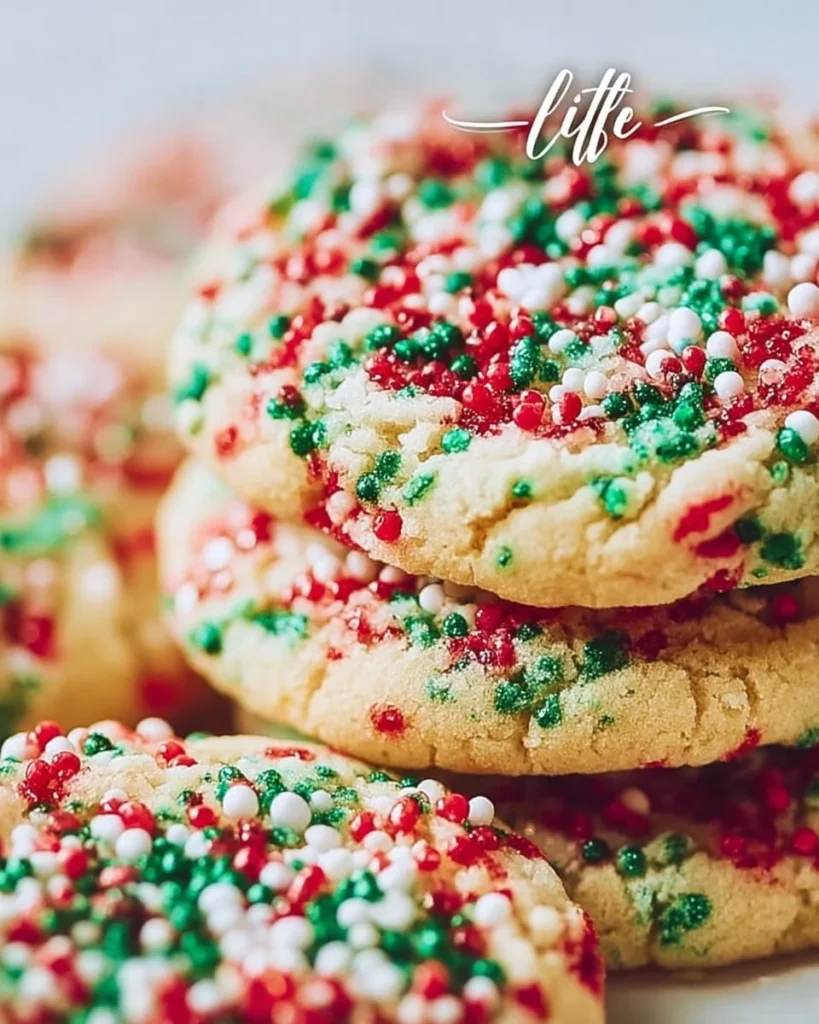
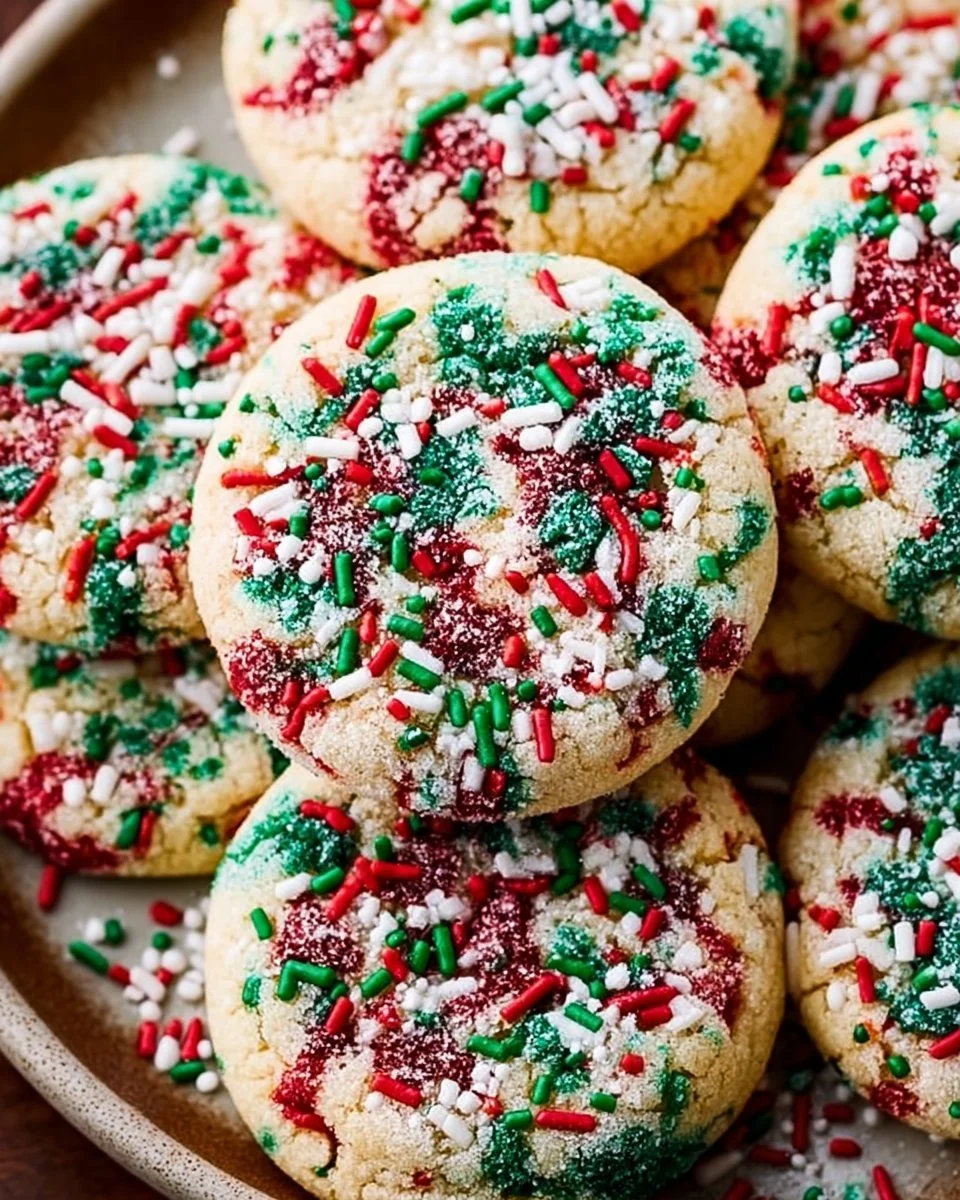
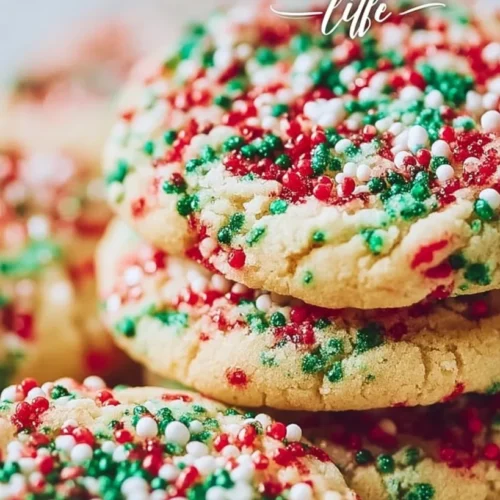
The Best Softbatch No-Roll Holiday Sprinkles Cookies
The holidays are a magical time, one where the air is filled with the scent of evergreen and cinnamon, where twinkling lights hang from the rooftops, and where families gather around tables laden with goodness. Growing up, my home was always a flurry of activity this time of year. One of my absolute favorite holiday traditions was baking cookies with my mom. We danced around the kitchen, flour dusting our noses like festive little snowflakes, and we’d sample dough straight from the bowl with a guilty giggle. But if I’m being real, no one baked better cookies than my mom.
Fast forward to my adult years, and I still find myself scraping bowls clean as a grown-up kid at heart. One recipe that’s become a staple in my kitchen during the festive season is the Softbatch No-Roll Holiday Sprinkles Cookies. Honestly, I could eat a dozen in one sitting—and I’m not ashamed to admit that! These cookies are soft, chewy, and bursting with vibrant holiday sprinkles, making them a festive treat for anyone, whether you’re a cookie lover or just someone who loves to nibble on something sweet while binge-watching holiday movies.
As I sit here writing this, the gentle hum of twinkling lights brings a wave of nostalgia, and I can almost hear my mom’s laughter echoing through our cozy kitchen. With each batch, I’m reminded of the magic those moments held. The best part? There’s no rolling required! You simply drop spoonfuls on a baking sheet, which means less cleanup, more time for family games, and a much lower risk of kitchen disasters. Is there anything better than that?
Why You’ll Love This Recipe
- Quick and Easy: Seriously, these cookies come together in under 30 minutes. Great for last-minute holiday gatherings or that late-night craving (I’m not judging).
- Picky Eater Approved: Kids and adults alike can’t resist their chewy goodness and fun colors. I mean, who doesn’t love sprinkles?
- No Need for Fancy Tools: Just a bowl, a whisk, and a baking sheet. Less fuss means more time for enjoying the festive season!
- Versatile Texture: They’re soft on the inside but have just enough bite on the outside. It’s that perfect balance we all know and love.
- Great for Gifting: Pack them up in a cute tin with a ribbon, and you’ll be the holiday hero. Trust me; they make fabulous gifts for neighbors or colleagues.
- Feel-Good Vibes: Just one bite, and it feels like a hug in a bowl. There’s something incredibly comforting and warming about these little creations.
What Makes This Recipe Special?
The unique thing about these cookies is the delightful chaos of sprinkles. Each colorful bite is like a little celebration itself! It helps lift my spirits—especially during times that can feel overwhelmingly busy. Plus, there’s a simplicity to the recipe that brings back memories of baking with family. It’s also fail-proof—no rolling means no worrying about whether those cookies will take the shape of a star or a confusing abstract art piece.
The blend of buttery richness, the sweetness from the sugars, and that hint of vanilla creates a flavor profile that is just chef’s kiss. When you take a bite, you not only taste the cookie but the memories behind making it—a nostalgic treasure trove of joyful holiday moments.
And let’s talk about the sprinkles! They’re like little nuggets of happiness that turn an average cookie into a festive masterpiece. So, it’s not just about baking; it’s about crafting a sweet little symbol of indulgence that adds a splash of color to your holiday table.
Ingredients
- 2 1/4 cups all-purpose flour: This is the base for our cookies! It gives them structure without making them tough.
- 1 teaspoon baking soda: This is essential for that lovely lift, ensuring the cookies spread perfectly as they bake.
- 1/2 teaspoon salt: A little salt goes a long way in amplifying the sweetness.
- 1 cup unsalted butter, softened: Butter is the star of the show, providing that rich, creamy flavor that makes you go back for more.
- 3/4 cup granulated sugar and 3/4 cup brown sugar, packed: This perfect sugar duo creates the desired texture and helps develop that delicious caramelized flavor.
- 1 teaspoon vanilla extract: Because, let’s be honest, vanilla is the invisible magic that transforms your cookies from drab to fab.
- 2 large eggs: Eggs help bind everything together, encouraging that soft, chewy middle.
- 1 cup holiday sprinkles: The fun part—these add a colorful pop and a touch of whimsy.
When using sugars, I prefer unrefined sugars when possible; if you can find organic versions, they have a richer flavor! Also, don’t skimp on the butter—you’ll thank me later. As for the holiday sprinkles, nothing beats the joy of colorful sprinkles mingling with warm cookie dough; it’s like a party in every bite!
Don’t do this: Avoid using old or stale baking soda, as that could lead to cookies that don’t rise properly. Nobody likes a flat cookie!
How to Make It Step-by-Step
Alright, let’s roll up those sleeves and dive into making these delightful cookies! I promise that if you can decipher a box of takeout, you can conquer this recipe.
Step 1: Preheat the Oven
First up, preheat your oven to 350°F (175°C). I always forget this step and end up waiting forever!
Step 2: Mix Dry Ingredients
In a large bowl, whisk together the flour, baking soda, and salt. It’s incredibly satisfying to see that lovely fluffy mixture come together. I like to visualize it as the foundation of my cookie castle—totally over-the-top, but isn’t that what the holidays are for?
Step 3: Cream the Butters and Sugars
Now for the magic—grab a large mixing bowl (an electric mixer works wonders here, but a good old-fashioned arm workout with a whisk does the job too). Cream together the softened butter, granulated sugar, and brown sugar until you get that beautiful light and fluffy consistency, about 2-3 minutes. The combination of buttery and sugary scents is enough to make anyone feel warm and cozy.
Step 4: Beat in Eggs and Vanilla
Next, here comes the egg-citing part! Beat in the eggs one at a time. Make sure they’re at room temperature for a smoother mix. Then add that fragrant vanilla extract and just take a second to inhale the sugary, buttery goodness (honestly, I could nose-dive straight into this bowl).
Step 5: Combine Dry and Wet Ingredients
Gradually mix in your dry ingredient mixture to the wet mixture until it just comes together. Don’t overmix! It’s unnecessary and could result in a less-than-stellar cookie texture. We’re aiming for fluffy here, not dense.
Step 6: Add the Holiday Sprinkles
Now for the pops of joy! Fold in those holiday sprinkles gently. It’s so fun to watch the bright colors distribute throughout the dough. I could do this for hours—it’s like mixing colors with Mr. Potato Head at Christmastime.
Step 7: Scoop the Dough
Using a tablespoon, drop tablespoon-sized balls of cookie dough onto a baking sheet lined with parchment paper. Remember, these babies will spread a bit, so give them some space! My kitchen is usually a chaotic symphony of dough balls and sprinkles at this point—what a sight to behold!
Step 8: Bake
Bake the cookies in your preheated oven for 10-12 minutes until the edges are lightly golden. You want them to look just a tad underbaked, as they will continue to cook a bit on the sheet after removing.
Step 9: Cool and Transfer
Let them cool on the baking sheet for a few minutes. This is the hardest part—don’t touch them yet! Your patience will pay off, I promise. Once cooled a bit, carefully transfer the cookies to a wire rack to cool completely. You should hear a little crackle as they settle, which is music to my ears.
And voila! You should be met with a tray full of beautiful, colorful cookies that will make anyone’s heart skip a beat.
Tips for Best Results
-
Use Room Temperature Ingredients: This is like a cheat code for baking success! Room temperature butter and eggs blend better, creating better texture.
-
Don’t Overmix: This ensures that you achieve a soft and chewy cookie. Mix just until everything is combined.
-
Quality of Ingredients Matters: Use good butter, and vanilla extract—trust me; it truly enhances the flavor.
-
Chill the Dough: If you want thicker cookies, chill the dough in the fridge for about 30 minutes before baking.
-
Adjust for Oven Differences: Every oven is different, so keep an eye on your cookies. If they seem to cook faster or slower, adjust the cook time as needed.
Ingredient Substitutions & Variations
Who doesn’t love customizing a recipe? Here are some fun swaps you can try:
- Flour: If you want a gluten-free option, use a 1:1 gluten-free flour blend.
- Butter: Coconut oil can work in place of butter if you want a dairy-free option; just melt it first!
- Sweeteners: For a lower-sugar version, try using coconut sugar or a sugar substitute, but keep in mind this may change the cookie texture slightly.
- Add-Ins: Try mini chocolate chips, chopped nuts, or a hint of peppermint extract for a seasonal twist!
You can mix and match flavors depending on what makes you feel cozy or festive. The holiday season is all about those touches that make it uniquely yours!
Directions
- Preheat your oven to 350°F (175°C).
- In a bowl, whisk together flour, baking soda, and salt.
- In a large mixing bowl, cream together the softened butter, granulated sugar, and brown sugar until light and fluffy.
- Beat in the eggs one at a time, then stir in the vanilla extract.
- Gradually mix the dry ingredients into the wet ingredients until just combined.
- Fold in the holiday sprinkles.
- Drop tablespoon-sized balls of dough onto a baking sheet lined with parchment paper.
- Bake for 10-12 minutes or until the edges are lightly golden.
- Allow to cool on the baking sheet for a few minutes before transferring to a wire rack to cool completely.

Pairing Ideas (Drinks, Sides, etc.)
So, what pairs well with these cookies? Here are some of my favorite ideas:
- Cocoa or Hot Chocolate: Because who doesn’t love a warm, comforting drink paired with a delicious cookie? I swear, sipping cocoa while indulging feels like a cozy hug.
- Milk: The classic combo—both kids and adults love it. Plus, there’s something about the crunch of a cookie followed by a refreshing sip of milk that just hits the spot.
- Coffee or Tea: For the adults out there, a light roast coffee or chai latte complements the sweetness perfectly, adding a cozy vibe to your cookie enjoyment.
- Holiday Eggnog: For those who enjoy a festive twist, bring on the nog! It’s like a holiday flavor bomb giving your cookies a warm embrace.
These cookies also make for great addition to a dessert platter alongside fruit tarts, gingerbread men, or even a full feast!
How to Store and Reheat Leftovers
If you’re lucky enough to have leftovers (or if you haven’t eaten the whole batch yourself), here’s how to preserve that nostalgia for later.
To store, let the cookies cool completely, then store them in an airtight container at room temperature. They’ll stay fresh for about a week— if you can manage to keep them that long!
For a chewy, gooey treat whenever the craving strikes, pop them in the microwave for 10 seconds. It’s like biting into a warm cloud of happiness!
Make-Ahead and Freezer Tips
Got a big event coming up? These cookies can totally be made ahead! Prepare the dough, scoop it into balls, then freeze them on a baking sheet. Once frozen, transfer the dough balls to an airtight container or zip-top bag for up to 3 months.
When you’re ready to bake, just pop them straight onto a baking sheet from the freezer and add an extra minute or two to the baking time—easy as pie (or cookies)!
Common Mistakes to Avoid
-
Too Warm Butter: Make sure your butter isn’t melted. If it is, you’ll end up with flat, sad cookies.
-
Overbaking: Take them out when they are just lightly golden at the edges. They’ll continue to cook as they cool on the sheet.
-
Skipping Parchment Paper: This is your friend for easy cookie lifting! Skipping it can lead to some frustrating moments when you heroically attempt to retrieve your creations.
Frequently Asked Questions (FAQ)
Can I make these cookies vegan?
Absolutely! Swap the eggs for flax eggs (1 tablespoon flaxseed meal + 2.5 tablespoons water per egg), and use dairy-free butter.
What if I don’t have holiday sprinkles?
Use any kind of sprinkles you have on hand. Or get creative with chocolate chips, dried fruit, or nuts!
How do I make the dough ahead of time?
You can prepare the dough in advance and store it in the fridge for up to 3 days, or freeze it for later. Just let it sit out for a bit before baking!
Can I use less sugar?
You can experiment with reducing the sugars, but do note they contribute to the texture and moisture of the cookie.
Cooking Tools You’ll Need
- Mixing bowls (a variety of sizes)
- Measuring cups and spoons
- Whisk
- Electric mixer (optional, though I highly recommend it!)
- Rubber spatula for folding in the goodies
- Baking sheet and parchment paper
- Cookie scoop (optional, but makes for uniform cookies!)
Final Thoughts
These Softbatch No-Roll Holiday Sprinkles Cookies are a delightful nod to the simplicity and joy of the holiday season. Whether you’re whipping them up for an event, sharing them with loved ones, or indulging as a post-dinner treat, they’re sure to bring warmth and cheer.
There’s something energetic and festive about these cookies that transcends the flavors in your mouth, reaching right into the heart. I encourage you to make them a part of your own traditions!
If you enjoyed this recipe, don’t forget to save it on Pinterest or share it with a friend! Happy baking and happy holidays, my friend!
Softbatch No-Roll Holiday Sprinkles Cookies
Ingredients
Dry Ingredients
- 2 1/4 cups all-purpose flour This is the base for our cookies! It gives them structure without making them tough.
- 1 teaspoon baking soda Essential for that lovely lift, ensuring the cookies spread perfectly.
- 1/2 teaspoon salt Amplifies the sweetness.
Wet Ingredients
- 1 cup unsalted butter, softened Provides that rich, creamy flavor.
- 3/4 cup granulated sugar For sweetness and texture.
- 3/4 cup brown sugar, packed Adds a caramelized flavor.
- 1 teaspoon vanilla extract Transforms the cookies from drab to fab.
- 2 large eggs Bind everything together.
- 1 cup holiday sprinkles Adds a colorful pop and fun.
Instructions
Preparation
- Preheat your oven to 350°F (175°C).
- In a large bowl, whisk together the flour, baking soda, and salt.
- In a large mixing bowl, cream together the softened butter, granulated sugar, and brown sugar until light and fluffy.
- Beat in the eggs one at a time, then stir in the vanilla extract.
- Gradually mix the dry ingredients into the wet ingredients until just combined.
- Fold in the holiday sprinkles.
- Drop tablespoon-sized balls of dough onto a baking sheet lined with parchment paper.
Baking
- Bake for 10-12 minutes or until the edges are lightly golden.
- Allow to cool on the baking sheet for a few minutes before transferring to a wire rack to cool completely.