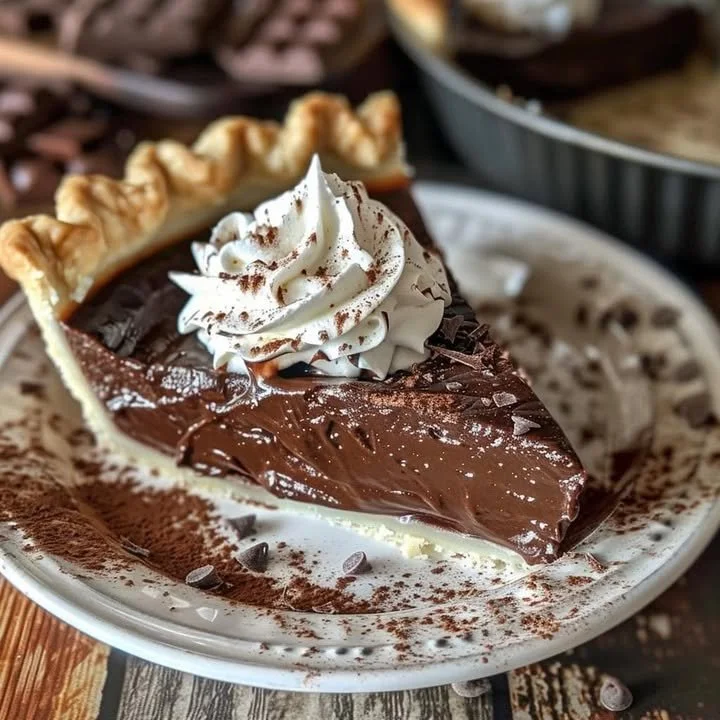
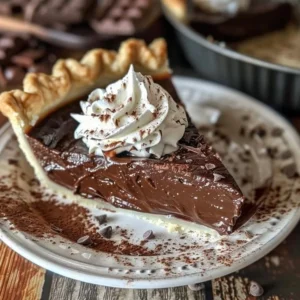
Easy Old-Fashioned Chocolate Pie Recipe
I still remember the first time I attempted to make an old-fashioned chocolate pie. It was one of those gloomy afternoons where the rain pitter-pattered against the window, and the comforting aroma of chocolate seemed like the perfect remedy for the gray skies. I gathered my ingredients, excited and a bit nervous, convinced that I could channel my inner baker. I mean, how hard could it be? Oops! I may have forgotten to blind bake the pie crust initially, which resulted in a soggy bottom that would make any grandmother weep! But hey, every great dessert has a story, right? You may also find Chocolate Coffee Whoopie Pies useful.
As it turns out, this recipe became a staple in our home, not just for its rich, velvety texture and chocolatey goodness, but also for the memories created around it. The process has its quirks and challenges, but when you pull that gloriously chilled pie from the fridge, topped with a cloud of whipped cream, it’s all worth it! The simplicity of the ingredients and the technique make it a comforting classic. Trust me, there’s something incredibly satisfying about slicing into a pie that you made with your own hands, knowing it will bring smiles to your family. You may also find Chocolate Peppermint Mousse useful.
You’ll find this rich chocolate pie doesn’t just satiate your sweet tooth—it also wraps you up in nostalgia. It’s the kind of dessert that feels like a hug in a bowl, making even the stormiest days seem brighter—and if you’re like me and have kids or are just really into high protein meals, you can appreciate the joy it brings! Plus, if you love chocolate desserts, you can also explore recipes like chocolate chip cookie dough cheesecake for a delightful twist.
Why You’ll Love This Recipe
- Comforting & Satisfying: This pie feels like a warm embrace on a chilly evening.
- Simple Ingredients: You likely have most of these pantry staples at home already.
- Memorable Moments: This recipe is bound to create sweet memories for years to come.
- Versatile: It pairs wonderfully with various drinks and makes for a classic dessert after any meal.
- Impressive Yet Easy: Perfect for impressing guests without being too complicated.
- Leftover Magic: Trust me, if you have leftovers, they taste just as good the next day!
What Makes This Recipe Special?
Old-fashioned chocolate pie is the epitome of simplicity combined with flavor. Made from basic ingredients like cocoa powder, sweetened with love (and sugar), it evokes heartfelt memories. There are no fancy tricks, just honest baking that allows the rich flavors to shine through.
This pie stands out because it’s not overly fussy. It’s that cozy dessert you whip up for family gatherings or a casual Friday night with your favorite rom-com on TV. The creamy filling is unparalleled, and topping it off with fresh whipped cream elevates it to sheer slice-of-heaven status. If you’re feeling adventurous, you can take a peek at some delightful variations included in other desserts like chocolate crinkle cookies.
Ingredients
For the Pie Crust:
- 1 1/4 cups all-purpose flour
- 1/2 tsp salt
- 1/2 cup unsalted butter, chilled and cut into cubes
- 3-4 tbsp ice water
For the Chocolate Filling:
- 1 cup granulated sugar
- 1/3 cup unsweetened cocoa powder
- 1/4 cup cornstarch
- 1/4 tsp salt
- 4 large egg yolks
- 2 1/2 cups whole milk
- 2 tbsp unsalted butter
- 1 tsp vanilla extract
For the Whipped Cream Topping:
- 1 cup heavy cream, chilled
- 2 tbsp powdered sugar
- 1/2 tsp vanilla extract
When it comes to making this pie crust, I’ve learned the hard way that using chilled butter is a game-changer. It helps create that flaky texture while baking. Don’t skip the refrigeration step either—trust me, it matters! And if you’re looking for an easy weeknight dinner that might impress, remember that this pie can be paired well with a meal that’s hearty yet light, like a salad or grilled chicken, as it satisfies your sweet cravings afterward!
How to Make It Step-by-Step
-
Prepare the Pie Crust: In a large mixing bowl, whisk together the flour and salt. Add the chilled butter and blend until coarse crumbs form. Gradually mix in the ice water until the dough holds together. Shape it into a disk, wrap in plastic, and refrigerate for 1 hour. This is the perfect time to rehearse your pie skills or to enjoy a quick high-protein snack.
-
Blind Bake the Crust: Preheat your oven to 375°F (190°C). Roll out the chilled dough on a lightly floured surface and transfer it to a pie dish. Trim the edges and prick it with a fork. Line the crust with parchment paper, fill with weights, and bake for 15 minutes. Remove the weights and bake for an additional 10-12 minutes until golden. Honestly, taking time to bake the crust properly prevents any soggy surprises later—the aroma will have you dreaming!
-
Make the Chocolate Filling: In a medium saucepan, whisk together the sugar, cocoa powder, cornstarch, and salt. In another bowl, whisk the egg yolks and milk until well combined. Gradually mix the egg yolk mixture into the cocoa mixture, whisking constantly. Cook over medium heat, stirring constantly until thickened. Oops! Be careful when cooking; you don’t want to rush this step, or you’ll have a lumpy filling.
-
Finish the Filling: Once thickened, remove from heat, and stir in the 2 tablespoons of butter along with the vanilla extract. Pour the filling into the cooled crust and spread it evenly. Now this is the part where you might be tempted to taste the filling—go ahead! But remember, it gets even better once it chills. Cover it with plastic wrap and refrigerate for at least 4 hours.
-
Prepare the Whipped Cream: Whip the heavy cream with powdered sugar and vanilla extract until stiff peaks form. I love this part—it’s like magic watching the cream transform.
-
Serve: Remove the plastic wrap from the pie. Gently top the pie with the whipped cream if desired; honestly, who’s going to say no to whipped cream? Slice it up and serve chilled. Paired with a good movie or family gathering, it’s true bliss.
Tips for Best Results
- Don’t Rush: Take your time when mixing the filling; you want it to be beautifully smooth.
- Chill Your Bowl: When whipping the cream, chill your mixing bowl for a lovely consistency.
- Make It Your Own: Experiment with flavors by adding a splash of espresso to the filling for extra richness or different extracts to the whipped cream.
Ingredient Substitutions & Variations
If you don’t have whole milk, you can substitute with a blend of half-and-half and water for that creamy texture. For a vegan twist, consider using a dairy-free milk and a plant-based whipped cream. Honestly, the beauty of this recipe is how flexible it can be, adapting to whatever you have on hand!
Directions
- Prepare the pie crust.
- Blind bake until golden brown.
- Mix the chocolate filling and cook until thickened.
- Pour into the cooled pie crust and chill.
- Whip the cream and top before serving.

Pairing Ideas (Drinks, Sides, etc.)
This chocolate pie pairs wonderfully with a strong cup of coffee or a creamy vanilla ice cream. For a lighter touch, consider serving it alongside fresh berries. And to be real, enjoying a slice with a great rom-com can turn any night into a memorable event!
How to Store and Reheat Leftovers
If you have leftover pie (and that’s a big “if”), store it covered in the fridge for up to 3-4 days. Honestly, it’s just as good chilled, so there’s no need for reheating! Just slice, serve, and enjoy!
Make-Ahead and Freezer Tips
You can prepare the pie crust ahead of time and freeze it for up to a month. Once you’ve filled it, though, freezing is not recommended as it may alter the texture.
Common Mistakes to Avoid
- Soggy Bottom: Blind baking the crust is essential! Otherwise, you’ll end up with a disappointing texture.
- Lumpy Filling: Make sure to whisk the cocoa mixture well before adding the milk and egg—as I’ve learned, this mistake can haunt you!
Frequently Asked Questions
Q: Can I use dark chocolate instead of cocoa powder?
A: Absolutely! Just remember to adjust the sugar to taste, as dark chocolate can have different sweetness levels.
Q: How do I know when the filling is thickened?
A: It should coat the back of a spoon and hold its shape. A spoon test is a good trick to check.
Q: Can I make this pie without eggs?
A: Yes! You can use egg replacers like cornstarch mixed with water to mimic the egg yolks.
Cooking Tools You’ll Need
- Mixing bowls
- Whisk
- Saucepan
- Pie dish
- Parchment paper and weights for blind baking
Final Thoughts
Baking this old-fashioned chocolate pie isn’t just about following a recipe; it’s about creating moments and cherishing the simple joys in life. Whether you’ve nailed it on your first try or faced a few mishaps, the end result is sure to bring warmth to your heart and a smile to your face. I would love to hear about your experiences, so please share your version or any special twists you’ve made!
If you enjoyed this recipe, don’t forget to save it on Pinterest or share it with a friend!
Conclusion
If you’re looking for delightful chocolate pie alternatives, check out Grandma’s chocolate pie or perhaps the classic Old Fashioned Chocolate Pie. For those who love a creamier texture, you might enjoy the Old Fashioned Chocolate Cream Pie. Each recipe brings its unique twist on a beloved classic that will surely warm your heart and home.
Old-Fashioned Chocolate Pie
Ingredients
For the Pie Crust
- 1 1/4 cups all-purpose flour
- 1/2 tsp salt
- 1/2 cup unsalted butter, chilled and cut into cubes Chilled butter helps create a flaky texture.
- 3-4 tbsp ice water Use enough to hold the dough together.
For the Chocolate Filling
- 1 cup granulated sugar
- 1/3 cup unsweetened cocoa powder
- 1/4 cup cornstarch
- 1/4 tsp salt
- 4 large egg yolks
- 2 1/2 cups whole milk Can substitute with half-and-half and water.
- 2 tbsp unsalted butter
- 1 tsp vanilla extract
For the Whipped Cream Topping
- 1 cup heavy cream, chilled
- 2 tbsp powdered sugar
- 1/2 tsp vanilla extract
Instructions
Preparation
- In a large mixing bowl, whisk together the flour and salt. Add the chilled butter and blend until coarse crumbs form. Gradually mix in the ice water until the dough holds together. Shape it into a disk, wrap in plastic, and refrigerate for 1 hour.
Blind Baking the Crust
- Preheat your oven to 375°F (190°C). Roll out the chilled dough on a lightly floured surface and transfer it to a pie dish. Trim the edges and prick it with a fork. Line the crust with parchment paper, fill with weights, and bake for 15 minutes. Remove the weights and bake for an additional 10-12 minutes until golden.
Making the Chocolate Filling
- In a medium saucepan, whisk together the sugar, cocoa powder, cornstarch, and salt. In another bowl, whisk the egg yolks and milk until well combined.
- Gradually mix the egg yolk mixture into the cocoa mixture, whisking constantly. Cook over medium heat, stirring constantly until thickened.
- Once thickened, remove from heat, and stir in the 2 tablespoons of butter along with the vanilla extract. Pour the filling into the cooled crust and spread it evenly.
Chilling and Topping
- Cover the pie with plastic wrap and refrigerate for at least 4 hours.
- Whip the heavy cream with powdered sugar and vanilla extract until stiff peaks form.
- Remove the plastic wrap from the pie. Gently top the pie with the whipped cream. Slice it up and serve chilled.