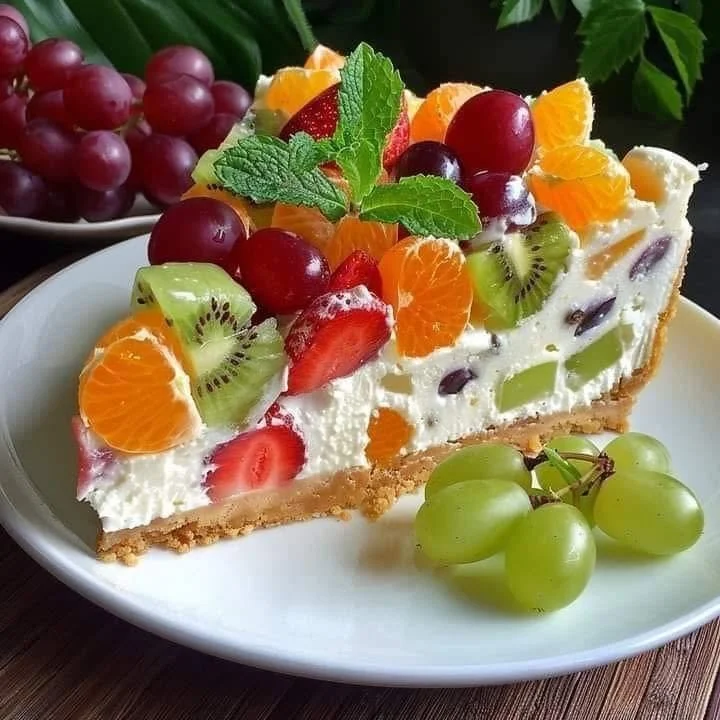
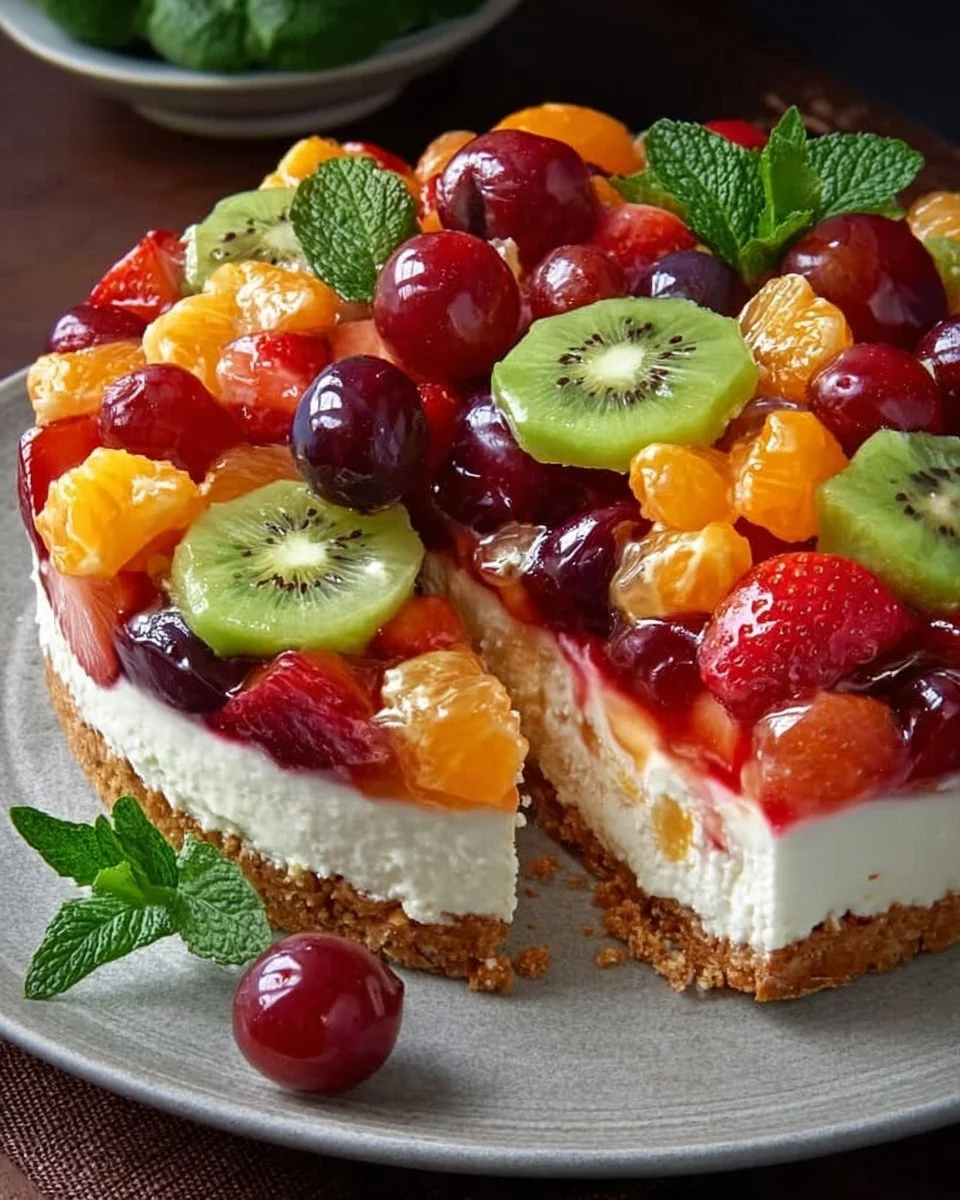
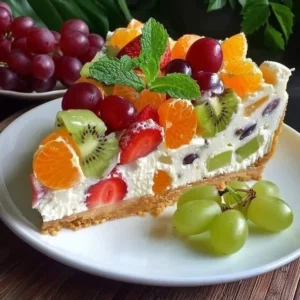
Easy Fruit Salad Cheesecake Recipe
There’s something undeniably comforting about a fruit salad cheesecake, wouldn’t you agree? It takes me back to those cozy family gatherings when dessert was the crown jewel of the meal. As a kid, no summer picnic felt complete without a chilled, creamy cake covered with colorful fruit piled high. Let’s be real, my first attempts at this lush dessert were a total mess, but eventually, I managed to nail down a version that has become a staple in my kitchen. You know the one—an enchanting layer of vanilla wafting through the air, mixed with bright citrus and sweet cherries. Honestly, if there’s one thing that feels like a big warm hug, it’s this cheesecake. You may also find Hawaiian Cheesecake Salad useful.
This fruit salad cheesecake matters to me not just for its delightful taste, but it also represents connection. I remember making this recipe with my mom, and she would joke about how I could’ve probably used glue instead of gelatin during my clumsy attempts. I mean, who hasn’t faced a minor kitchen disaster? But regardless of our little oops moments, we always ended up with a beautiful cake that made everyone smile. Now, every time I whip this up, I recall those cheerful days, whether it’s a family gathering or just a simple evening snuggled up on the couch with a film. You may also find Blackberry Avocado Salad useful.
The process is pretty straightforward, too! With a few simple ingredients, you can create something that looks and tastes like it took hours to prepare. Trust me, it’ll be your new go-to for everything from birthday parties to potlucks or even a cozy night in. After all, who doesn’t love easy weeknight dinners that double as dessert? You may also find Blood Orange Avocado Salad 2 useful.
Why You’ll Love This Recipe
- A Dessert That Delivers: This cheesecake manages to combine the fluffy creaminess of cheesecake with the freshness of fruit salad, making it a crowd-pleaser.
- No-Bake Option: Perfect for summer when you don’t want to heat up the kitchen!
- Versatile Flavors: You can mix and match fruits based on what’s in season or what you have lurking in the fridge.
- Picky Eater Approved: Kids and adults alike find it tough to resist this creamy confection.
- Make-Ahead Magic: Chill it overnight for a hassle-free treatment the next day. Just slice and serve!
- Looks Stunning: It’s as gorgeous as it is delicious. A beautifully layered cheesecake always turns heads!
What Makes This Recipe Special?
This fruit salad cheesecake stands out due to its unique combination of flavors and textures. The creamy base, crafted from cream cheese and gelatin, creates that indulgent mouthfeel while the juicy fruits add a beautiful burst of freshness. It’s almost like a party in every bite! I love adding various fruits—each one adding its own character to the cheesecake. The contrast between the sweet, tart, and creamy layers is absolutely delightful; it’s hard to pick a favorite! You could try a delightful twist by incorporating a tangy blood orange or a vibrant blackberry avocado salad mix for a gourmet touch. You may also find Blood Orange Avocado Salad useful.
Ingredients
- 1 1/2 cups vanilla wafer crumbs: These are essential for the crust, adding a sweet and crunchy base that pairs well with a creamy filling.
- 2 tablespoons butter, melted: It helps bind the crumb mixture.
- 1 (20 oz.) can crushed pineapple, drained: Adds sweetness and natural juiciness, but make sure to drain it well so you don’t end up with a soggy crust!
- 3/4 cup granulated sugar: A must for that creamy base. Don’t skimp on this!
- 1/2 cup cold water: Needed to hydrate the gelatin.
- 2 envelopes unflavored gelatin: This is critical—it sets the cheesecake! I once made a version without it, and let’s just say it was more of a colorful soup.
- 1 (8 oz.) package cream cheese, cubed: The star of the show! It gives that creamy texture I can’t get enough of.
- 1 1/2 cups halved seedless grapes: These not only enhance the flavor but also add a lovely pop of color.
- 1 (11 oz.) can mandarin oranges, drained and cut in half: Their tartness complements the sweetness of other fruits perfectly.
- 1 (10 oz.) jar maraschino cherries, drained and roughly chopped: Just a handful adds a nostalgic touch.
- 1/2 cup finely chopped pecans: A crunchy element that rounds out the flavors.
- 2 cups whipped topping (such as Cool Whip): For that light and airy finish.
Tips and Tricks
When preparing for this recipe, keep in mind that patience is key! I’ve had my fair share of set-backs where I rushed the cooling process, and ended up with a not-so-pretty mess. Wait for your filling to cool completely before folding in the whipped topping. Also, don’t be afraid to get creative—using fruits like strawberries or even a splash of coconut can make your cheesecake uniquely yours!
How to Make It Step-by-Step
-
Prepare the Crust: In a small bowl, mix the vanilla wafer crumbs with the melted butter until it’s well combined. The mix should hold together if you squeeze it in your hand. Press this mixture into the bottom of a 9-inch springform pan coated with nonstick spray. Make sure it’s even, and you’re done with this stage!
-
Make the Filling: In a saucepan, cook the crushed pineapple over medium heat with the sugar for about five minutes until it’s heated through. This helps to marry those flavors. While the pineapple is cooking, sprinkle the gelatin over the cold water in a small bowl. Allow it to sit for a minute to soften, and then stir it into the pineapple mixture until it dissolves completely.
-
Melting the Cream Cheese: Lower the heat and add the cubed cream cheese into your warm pineapple mix. Stir continuously until everything is perfectly melted and smooth. Don’t walk away—this part is crucial to avoid lumps!
-
Cooling the Mixture: Remove the saucepan from heat and let it cool completely. This step can be tedious, but you don’t want to add the fruits to a hot mixture; trust me, it can get messy.
-
Adding the Fruits: Once your mixture is cool, carefully stir in the grapes, mandarin oranges, cherries, and pecans. The balance of flavors here is everything!
-
Fold in Whipped Topping: Gently fold in the whipped topping until all elements are fully combined but still fluffy!
-
Assemble the Cheesecake: Pour the fruit and cream cheese mixture into the prepared crust, smoothing the top with a spatula to make it look picture-perfect. A little finesse here goes a long way!
-
Chill: Cover the cheesecake with plastic wrap and refrigerate overnight, or for at least six hours to let it set. Patience is truly a virtue.
-
Serve: When ready to indulge, remove the cheesecake from the springform pan, slice, and serve chilled. For that extra touch, consider garnishing with additional fresh fruit or a sprinkle of crushed vanilla wafers.

Tips for Best Results
- Ingredients Matter: Always opt for quality cream cheese as it directly affects the cheesecake’s flavor.
- Don’t Rush the Cooling: Trust me on this one; rushing might not give you the texture you’re aiming for.
- Stir Gently: When folding in the whipped topping, handle with care to avoid deflating all the air you’ve worked so hard to incorporate!
Ingredient Substitutions & Variations
- Nut Allergies?: Go for sunflower seeds or leave out the nuts altogether.
- Seasonal Fruits: Use fruits that are in season or whatever you have on hand. Berries would be an excellent substitute!
- Low-sugar Variant: If you want a healthier twist, consider using a sugar substitute or fresh fruit juice instead of sugar for a lighter option.
Directions
- Best Pairings: This cheesecake pairs beautifully with a glass of iced tea or lemonade. Another fun idea? Serve it alongside a light salad for a sweet and savory balance—perfect for a summer lunch.
- Emotional Touches: Trust me, this dessert, paired with a rom-com, makes for a perfect evening!
How to Store and Reheat Leftovers
Store any leftovers tightly covered in the refrigerator. This cheesecake stays fresh for about four days, but I doubt it will last that long! If you’re like me, you’ll be sneaking bites late into the night. Don’t freeze it unless you want a semi-frozen cheesecake—it’s best enjoyed fresh the way it was made.
Make-Ahead and Freezer Tips
This cheesecake is an absolute star for meal prep! You can prepare it a day or two ahead of time. However, I wouldn’t recommend freezing it. The texture may differ once it thaws, so fresh is always best!
Common Mistakes to Avoid
- Not Draining: Ensure your fruits are drained adequately to avoid a soggy crust.
- Skipping the Chill: Don’t skip the chilling! This cheesecake needs time to set.
- Overmixing: When combining the ingredients, mixing too vigorously can actual deflate your mixture, leading to a denser consistency.
Frequently Asked Questions
1. Can I use fresh fruit instead of canned?
Absolutely! Fresh fruit can really elevate the flavor; just make sure to chop it small for even distribution.
2. How long will this cheesecake last?
In the fridge, it should keep well for about four days.
3. Can I make this vegan?
You could experiment with vegan cream cheese and alternative whipped toppings, but results may vary.
4. What can I serve with this cheesecake?
For the perfect summer treat, serve it with a scoop of vanilla ice cream or a fruit sorbet on the side!
Cooking Tools You’ll Need
- 9-inch springform pan
- Small saucepan
- Mixing bowls
- Spatula
Final Thoughts
This fruit salad cheesecake has a special place in my heart, filled with sweet memories and delicious flavors. It’s like creating a piece of my childhood every time I make it. I invite you to try this recipe and make it your own; maybe even come up with a fun flavor twist. Don’t forget to share your version with me!
If you enjoyed this recipe, don’t forget to save it on Pinterest or share it with a friend!
Conclusion
For those of you craving more delightful fruit salads, check out Fluffy Cheesecake Fruit Salad [+ Video] for a different take. If you’re interested in a classic fruit salad that packs a punch, try Fruit Salad Cheesecake | The Kitchen is My Playground. For a creamy option, Creamy Cheesecake Fruit Salad – Palatable Pastime could be your next culinary adventure. Finally, delight your taste buds with a Mixed Berry No Bake Cheesecake Salad – The Chunky Chef to expand your summer treats!
Fruit Salad Cheesecake
Ingredients
Crust Ingredients
- 1.5 cups vanilla wafer crumbs Essential for the crust, adding a sweet and crunchy base.
- 2 tablespoons butter, melted Helps bind the crumb mixture.
Cheesecake Filling Ingredients
- 1 20 oz. can crushed pineapple, drained Adds sweetness and natural juiciness.
- 3/4 cup granulated sugar Needed for the creamy base.
- 1/2 cup cold water Needed to hydrate the gelatin.
- 2 envelopes unflavored gelatin Critical for setting the cheesecake.
- 1 8 oz. package cream cheese, cubed The star of the show for creamy texture.
- 1.5 cups halved seedless grapes Enhances flavor and adds color.
- 1 11 oz. can mandarin oranges, drained and cut in half Complement the sweetness.
- 1 10 oz. jar maraschino cherries, drained and roughly chopped Adds a nostalgic touch.
- 1/2 cup finely chopped pecans Provides a crunchy element.
- 2 cups whipped topping (such as Cool Whip) Gives a light and airy finish.
Instructions
Preparation
- In a small bowl, mix the vanilla wafer crumbs with the melted butter until well combined.
- Press mixture into the bottom of a 9-inch springform pan coated with nonstick spray.
- In a saucepan, cook crushed pineapple over medium heat with the sugar for about 5 minutes.
- Sprinkle gelatin over cold water in a small bowl, let it sit for a minute, then stir into the pineapple mixture until dissolved.
- Lower heat and add cubed cream cheese to the pineapple mix, stirring until melted and smooth.
- Remove from heat and let cool completely.
- Once cool, stir in grapes, mandarin oranges, cherries, and pecans.
- Gently fold in whipped topping until fully combined.
- Pour the mixture into the prepared crust, smoothing the top with a spatula.
- Cover the cheesecake with plastic wrap and refrigerate for at least 6 hours or overnight.
Serving
- Remove cheesecake from springform pan, slice, and serve chilled.